Thanksgiving is one of my favorite holidays. I mean, come on, its basically about family and food. My two favorite things. And as many of you know, or could guess, my friends are my family too. Naturally, when I first moved to Austin in 2009, I hosted Thanksgiving, even though I had only lived here a month.
Not shockingly, I only had five people. It was me, my roommate Kelsey, our friend Kevin, Kelsey's new boyfriend Andy, and Andy's best friend Kate. It was okay, not very noteworthy I suppose, but fun. Since then, I have hosted a Friendsgiving for our Austin family every year on the weekend BEFORE Thanksgiving. Each year it grew, it was always an open door policy, bring your new girlfriend or someone from work, etc. and it was wonderful. Year four was the last year we had it in an apartment and we were really pushing the boundaries of space for about 30 people.
That spring I bought my house and so we were able to have the next one here which was so much fun and a very different vibe. We had a yard and so much more of a homey feel. That was also the first year that Aaron was here! Things kind of blew up after that. Last year things really seemed crazy...we had SIXTY-FIVE people! I mail out invitations now and that year I ordered over 40. While it was a ton of fun, it was also verging on totally crazy. No one really had anywhere to sit and there was way too much food. Its normally a bit of a potluck and there was just too much food - we even had to make two 25 lb turkeys!
So this year we sat down and had a real conversation about what we wanted out of the party. I missed the fun, casual time to sit and chat with good friends that we don't see all the time, but also, we have two kids now and I wanted to make it about their memories of the event too. So lots of people are very overwhelming for little kids and so many of our friends are parents now too. We decided that keeping the guest list to about 20 seemed reasonable (that's only ten couples) and about prioritizing the people that our kids like to be around.


It was really hard to shave the guest list down but it was worth it. This was the perfect amount of people and we had such a lovely time. I was way less stressed and things went really smoothly. I also had my best turkey yet. It was moist and tender and flavorful - and I don't even like turkey. I had a lot of people asking me how to make the turkey and to make sure I posted it before they did their Thanksgivings on Thursday so I will be writing that out.
We also had a sweet potato dish that I am going to share. It was probably the big hit of the dinner as well. The other two standouts from this year would also be my friend Karissa's roasted Cauliflower (I am going to try and get the recipe from her so I can share it with you because it was so awesome!) and the white cheddar version of my regular macaroni and cheese. I am going to put all those recipes up here for you but unfortunately I don't have any pictures yet! We were so busy socializing, chatting and just enjoying ourselves that I barely have any food pictures - everyone just dug right in!
I did get a bunch of pictures of all the neat stuff I did this year that was the culmination of seven years of hosting this party and now the third year with tiny guests. The first year we had kiddos at Friendsgiving there was just baby Townes and two other little ones. This year we had ten kids ranging from 4 years to 5 weeks old! It was absolutely awesome and they had the best time so I'm going to get started with tips on the kiddos and then on to the food!
Tips for Hosting Kiddos
I have an amazing time planning things for the kids - I was a preschool teacher, its really what I do. So the older all of our kids get, the more excited I am to do neat things to make their time while their parents socialize more enjoyable and to keep them busy so their parents can actually finish a sentence.
Step 1: Give them their space
I set our entire family room to be the kid zone. They would be out from underfoot near the food, there was a clear path to the back yard (our family room has a door right to the porch and thus to the swing set), and has the TV in it. I set all the adults tables in the dining room that is off the other side of the kitchen - we could see them and they were also free.


I used a low coffee table that we have (that is already covered in chalkboard paint) to set for them. Instead of place mats, I made coloring books by printing out Thanksgiving themed coloring pages (turkey, Mayflower, pumpkin, etc) and stapling them to a piece of thick card stock.
I made crayon holders (personalized for each kid, the older ones LOVE having something with their name on it) that were mini-pilgrim hats! They are just a black paper party cup, turned upside down and glued to a circle of black scrap book paper. I traced an upside-down large solo cup onto black paper and cut them out. Turn the paper cups upside-down and cut out the bottom carefully with an exact-o knife and then glue to the black circles. I used sparkly gold washi tape for the band and then a white paint pen to put their names on. I filled them with crayons and chalk.
If there is also one other thing that EVERY kid likes its bubbles, so I dug into my cabinets and found a couple of bubbles that hadn't been opened this summer and put those out too. I set up the boy's tee-pee for a little Thanksgiving ambiance and a place to play. We almost resurrected the red wagon-pirate ship from Halloween as the Mayflower, but didn't have time.
Step 2: Keep Them Busy
If the crayons and bubbles weren't going to distract them enough, I had a few other things to keep them playing. I made a Turkey Toss out of an old diaper box by wrapping it in black wrapping paper and then cutting up construction paper to decorate with a turkey. I cut out three hole with an exact-o knife and then reinforced the edges with scotch tape. Voila! I gave them a bunch of soft balls and they went to town throwing balls at the turkey trying to get them in the hole.


The center piece on their table was also doing double-duty for the little ones. It was a Paper Bag Turkey filled with Chex Mix! We cut open the top after the kids arrived and they were able to come and go from the table and grab a little handful of snacks without being underfoot near the kitchen.


Finally, with something that the adults had just as much fun with as the kids, was the Pilgrim hats and Native American headbands I made. They were actually pretty simple, they were made out of the craft foam sheets you can buy in packs at any craft store. For the pilgrim hats I just free-hand drew one hat on paper, cut it out and then traced it onto the black foam sheets and cut out as many as I needed. I cut white labels and wrapped them around for the band and then cut out yellow squares and glued them on with a hot glue gun. I cut strips of black foam sheet about an inch wide and eight inches long and attached elastic string to both ends to make a headband. Then I used my hot glue gun to attach the Pilgrim hat to the black head band. The Native American headbands were the same idea. I cut strips of colored foam sheets and then decorated them with shapes and feathers (also cut from foam) and then attached the string and there they were!
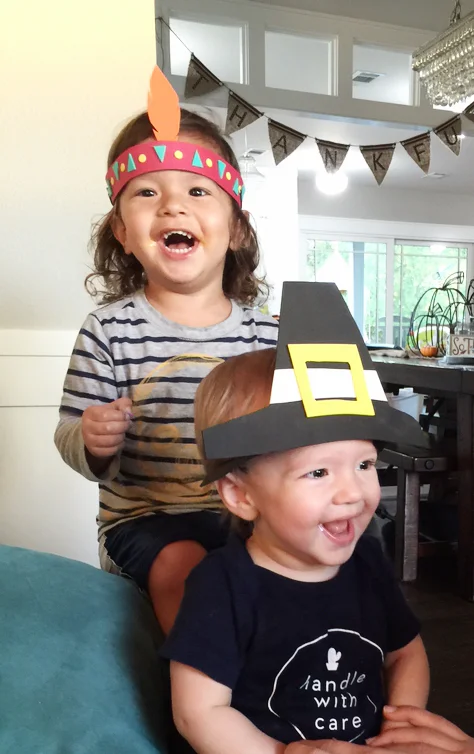
The kids had fun wearing them, but Chanel and I were guilty of wearing them around all morning while we were cooking too - I almost made the run to pick up the flowers with my headband on. We rounded out the entertainment by putting on Pocahontas and a Charlie Brown Thanksgiving on the TV - I have to admit that the soundtrack to Pocahontas was pretty fun.
Step 3: Make It Easy For Mom and Dad
After hosting a good amount of birthday parties, thanksgivings, etc, with the kids a few things have kept happening that I thought I could anticipate to make things easier on the other parents. Its already overwhelming having to keep track of your kid, hold a conversation, and eat your food without figuring out where to change a diaper, what to do with smelly poop, to ask for supplies or make sure your kid doesn't spill juice all over your host's carpet.
So this time I left out handy signs so parents could be as efficient as possible and not worry about trying to find me or Aaron to ask permission to use something while trying to hold on to a kid with poop running down their leg (we have all been there). What I suggest is picking out a spot to designate as a changing zone (if you don't already have one), ours is the laundry room right off the kitchen. I labeled the diaper sizes, the drawer of extra wipes, set out extra small bags for stinky diapers, a trash can, Lysol, hand-sanitizer, diaper cream, etc.


I was a little bit worried when I did it that it might come off as bossy or controlling, but I ended up getting a lot of positive comments about it because people felt like it made stuff a whole lot easier, given all the organized other chaos going on. I also followed this trend in the guest bathroom as well. Some of our little guests were potty training or recently potty trained so I set out an extra back of wipes there, spare pull-ups, a jar of M&Ms and a couple kids books, just in case.
Lastly, I set up some disposable "sippy cups" for parents to use as needed and not worry about losing. I just purchased a 12 pack of paper coffee cups with lids and then put bendy straws in the opening. I set out a marker for parents to label their kids cup (because we all know they put them down and don't remember where). There were set out right on the bar where the apple cider, cranberry cocktail and all the alcohol and cups for the older guests were. For the first time this year as well, I did not add alcohol to any of the drinks (the cider and cranberry cocktail), but rather set the liquor next to the juices so that if kids asked for some, they had other options than water. People also seemed to like being able to pour to their preference.
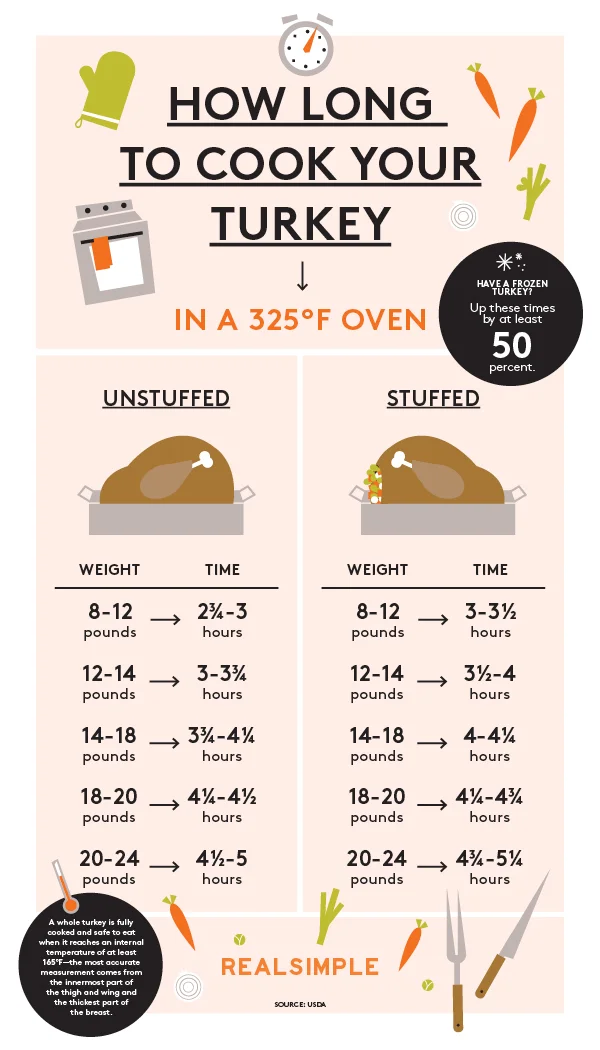
How to Cook the Winning Turkey
What I am about to share with you is the result of seven years of trying different turkey methods until finding perfection. I have seriously done it all; there was the famous turkducken of 2010, deep-fried turkey of 2013, smoked turkey of 2014 - we've been there, done that.
Up until this year, I will have to admit that the deep-fried turkey had been the favorite, followed by the smoked turkey. However, I have a fundamental problem with a cooking method that could potentially burn down the house so, sorry 2013, but I wasn't going to be able to take the stress of deep-frying again. And the smoked one was okay, but I wasn't personally a fan of the flavor for Thanksgiving - I wanted something savory and buttery. The smoker produced a sweet and tangy turkey, that was absolutely moist, but also took forever.
So this year I went back to my tried and true - oven roasting with a belly full of stuffing. But year after year the bird wasn't as tender as I thought it could be (even though I basted that baby with herb butter every 30 minutes). So I got some lessons from my professional chef friends and made my own brine this year and it was the right choice. So without further ado - here it is.
Southern Herb-Brined Roasted Turkey
- 1 fresh or defrosted turkey (about 1 lb per guest)
- 2 gallons of water (8 quarts)
- 2 cups kosher salt
- 1 1/2 cups dark brown sugar
- 1/2 cup dark molasses
- 1 tsp. dried chipotle powder
- 1 tbs. garlic powder
- 1 tbs. sage
- 1 tsp. thyme
- 1/2 tsp. tarragon
- Ground black pepper
- Large cooler or 2 basting bags and a roasting pan
- Basting Liquid:
- 2 sticks (1 cup) butter
- 1 tbs. minced garlic
- 1 tsp. sage
- 1 tsp. thyme
- Ground black pepper
- Sausage Stuffing:
- 2 lbs. ground Italian sausage
- 1 small yellow onion
- 2 tsp. minced garlic
- 3 generous tbs. ground sage
- 1 box RItz crackers (or other salted, buttery cracker)
- For the gravy:
- Up to 1 cup of flour
1-2 Days Before Thanksgiving:
Make your brine. In a large stock pot, big enough to hold 2 gallons of water (mine is a standard 10 qt pot) combine the salt, brown sugar, molasses and spices. Pour the 2 gallons of water over the spices and stir together. Bring the mixture to a boil, stirring frequently to dissolve the sugar and salt into the water. Once it is dissolved, removed the brine from the heat to cool completely - this is important because if it is not cooled it will parboil your turkey and that's gross, I promise.
Once your brine is room temperature or cooler, prepare your cooler or brining bags. I used two of the thick plastic bags that our grocery store gives you when you buy your turkey, but grocery stores should also sell large plastic bags for this purpose. I have also heard of people using coolers, but I have no idea how you would adequately sanitize it after, so I did not go this route. I placed my roasting pan on counter and opened up one of the bags, placed it in the roasting pan and rolled down the sides so I could place the raw turkey right in. You may want another set of hands to help with this part, I did.
Place your turkey in the sink and unwrap it, make sure the cavities are empty (neck and gibblets removed) and rinse out the inside carefully. Once that is done, place the turkey into the bag in the roasting pan and pour the brine over the turkey and into the bag. I had Aaron hold the edges of the bag steady while I poured.
Once your brine is all in, pull your bag closed and try to push out as much as a possible before tying it off completely. Once its tied, you will want to put the wrapped turkey into the second bag and tie that off as well (this is your insurance policy in case the first bag tears). Aaron even went further to wrap the whole thing in saran wrap which helped better distribute the brine all around the turkey.
Place your bagged turkey into the roasting pan and into your fridge for up to 36 hours. I placed mine in Thursday night to take out Saturday morning. Flip your turkey over half way through your brining time to make sure all parts of the turkey get equal amounts of immersion in the bring.
The Night Before Thanksgiving:
Make your stuffing. Dice up your onion small and saute in a large pan with the garlic until fragrant. Add the ground sausage and cook until sausage is cooked through, breaking up the meat with a spoon as you go and mixing into the onion and garlic. Once cooked, add the sage and season with salt and pepper. Stir well. Remove from heat. Three or four crackers at a time, crush the crackers over the stuffing and stir in, absorbing all the cooking liquid. I normally use 1 sleeve per pound of meat, so about 2 sleeves of crackers, but more if you need it. Stir well to combine, cover and refrigerate until morning.
Thanksgiving Day
Half an hour before cooking, remove your turkey from the fridge and release from the brine (in the sink, obviously). Place the turkey into the roasting pan and fill the cavities with the sausage stuffing. Allow the turkey to come up to room temp while your preheat the oven to 325°.
In a small sauce pan over medium-low heat melt the two sticks of butter with the garlic and herbs. Once melted bring to a bubble and then immediately remove from heat and stir. Set aside.
Place your oven rack to the lowest part of the oven and put your turkey in the oven. The chart will help you figure out how long you need to cook the bird, remember to cook it to 165°! I recommend planning on taking the turkey out 45 minutes or so before serving. You will want to let it rest before carving it and you will want to make the gravy from all the roasting juices.
Every hour, you will want to open up your oven and baste the turkey generously with the melted herb butter using a basting brush. If your turkey skin starts to brown on top faster than the rest of the bird is cooking, cover the areas with foil until the last 30 minutes of cooking.
Check your birds temp with a meat thermometer in the thickest part of the breast AND the thigh. Remove when its at least 165° and set it to rest.
Meanwhile, use this time to pop anything in the oven you may need to heat up (like sweet potatoes or macaroni and cheese).
Once that is done, you will want to scoop the stuffing out of your bird and into a separate serving dish - set aside and cover to keep warm.
Then carefully remove the turkey from the roasting pan and place onto a large cutting board or cookie sheet with a lip or a casserole dish. Pour the juices and fat from the bottom of the roasting pan into a large sauce pan over medium-high heat and bring to a soft boil. Whisk in flour a few table spoons at a time, incorporating until smooth after each addition. Add flour until your gravy is your desired consistency. Remove from heat, ladle into your desired serving dish and set aside.
Carve your turkey and place the pieces onto a serving platter. I have used this Buzzfeed guide to turkey carving the last two years and it hasn't failed me!