King Ranch Chicken Casserole

Until I moved to Texas I didn't eat a lot of casseroles, I'm gonna be honest.  Excluding baked ziti and lasagna, I don't think my mom just ever made any.  Turns out, I was missing out on some pretty awesome, easy to make, fantastic casseroles. 

Another thing I had missed out on, but have since converted to the church of, is the crock pot.  So truthfully, when I find a recipe that uses the crock pot and is a casserole, I pretty feel like I knocked it out of the park. That's exactly what this King Ranch Chicken recipe is. 

Truthfully, I also didn't know what King Ranch Chicken was before I moved to Texas.  If I had tried to guess from the name I would have though it was some kind of giant chicken breast, seasoned with a packet of Ranch dressing. But I was introduced to this amazing Texan Lasagna when I was the Curriculum Coordinator at a preschool in Round Rock and our super talented chef, Kathryn, would make the kids King Ranch Chicken.  She fed it to me once, when I was dying of morning sickness and it was my savior.

Kathryn's recipe, however, would not be easy for me to replicate since we are a family of 4, not 140, so the proportions might be off.  Also, I'm not particularly a fan of using cans of condensed soup for the base of recipes.  They can be very high in sodium and I'm not really a fan of the taste.  So when I came across a recipe for a completely from scratch version on Five Heart Home and gave it a shot and liked it a lot.  This is my tweaked, crock-pot-added, mushroom-optional version.

IMG_5065.JPG

King Ranch Chicken Casserole

Serves 6

INGREDIENTS:

For the Chicken:

  • 4 skinless, boneless chicken breasts
  • 3-4 cups chicken broth
  • 2 tbs. garlic powder
  • 2 tbs. adobo seasoning
  • 1 tsp. chipotle powder
  • 1 tsp. cumin
  • Salt & pepper

For the Sauce:

  • 6 tbs. butter
  • 4-6 oz. baby portabella mushrooms, diced small (optional)
  • 6 tbs. flour
  • 2 cups of chicken cooking liquid from crock pot
  • 2 cups milk
  • 1 tsp. garlic powder
  • 1 tsp. adobo seasoning
  • 1 tsp. cumin
  • 1/2 tsp. chipotle powder
  • Salt & pepper

For the Casserole:

  • 10 small corn tortillas
  • 4 cups shredded cheddar cheese, or jack blend
  • 1 cup of chicken cooking liquid from crock pot
  • 1 small can Rotel
  • Diced jalapenos (optional)
  • Fresh cilantro or parsley, chopped (optional)

In the bowl of your crock pot, cover the chicken with the chicken broth and add the seasoning.  Stir to coat the chicken and cook on high for 4-6 hours, until the chicken comes apart easily with a fork.  Once the chicken comes apart easily, roughly break apart the chicken breasts into smaller pieces to cook for 15 more minutes on high (I feel like the smaller the pieces the moister the chicken).

Remove the chicken from the crock pot with a slotted spoon and set aside to cool.  Turn off the crock pot, allow the remaining broth to cool and set aside.

Meanwhile, make the sauce.  Melt the butter in a saucepan over medium-high heat.  If you are using the mushrooms, sautee the mushrooms in the melted butter for 3-5 minutes, until cooked.  If omitting the mushrooms, just skip ahead.  Add the flour to the butter and whisk until blended.  Do not allow this to burn.

Add the milk and 2 cups of broth (from the crock pot) to the sauce and whisk until smooth.  Whisk in the seasoning and bring to a boil, then remove from heat and set aside.

Using two forks, shred the chicken as fine as possible.  Pour the sauce over the chicken and mix together.  Set aside.

Butter a rectangular baking dish.  Pre-heat an oven to 350 degrees. Assemble all the components of the casserole within easy reach (tortillas, chicken mix, remaining chicken broth, shredded cheese, drained Rotel and optional toppings).

Spread half of the chicken mix in the baking dish, top with shredded cheese, some Rotel and jalapenos.  Cover with a layer of tortillas.  I tear mine in half to make sure they cover every inch, overlapping is fine.  Drizzle some of the chicken broth over the tortillas, making sure to get the edges.

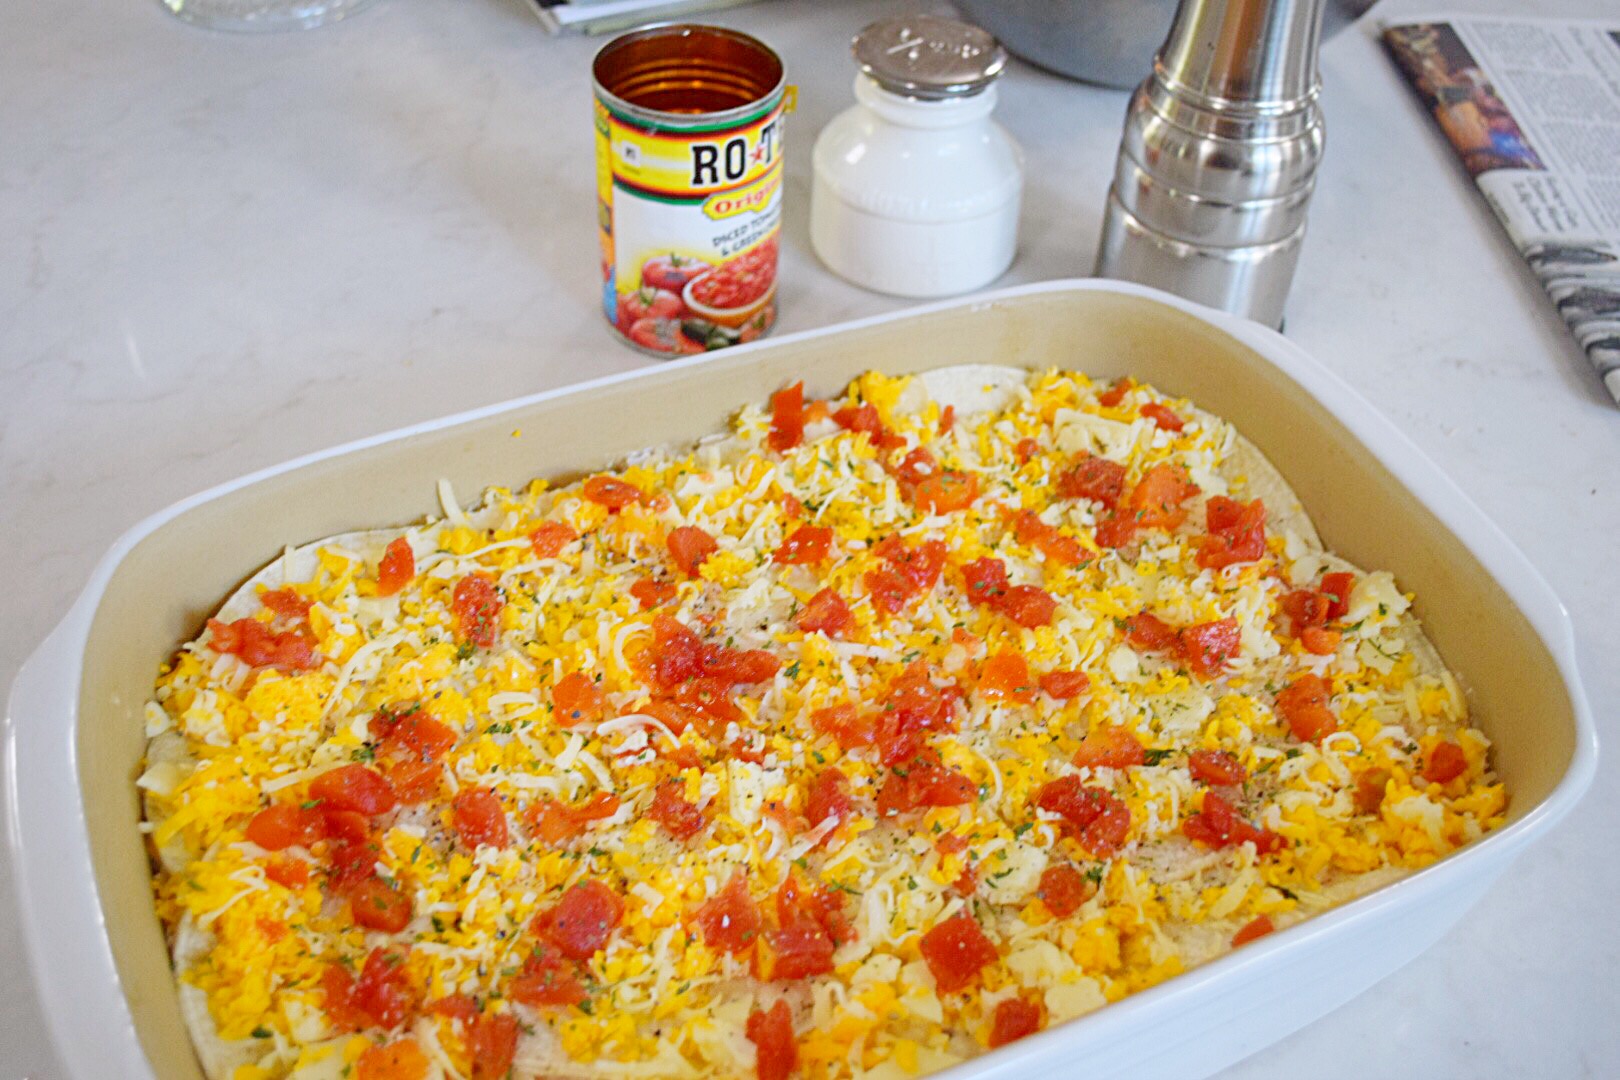
Top with the remaining chicken mixture and another layer of tortillas.  Top the tortillas with cheese, Rotel and other optional toppings. 

Cover with aluminum foil and bake for 15 minutes.  Remove the foil and bake until bubbly, about another 15 or 20 minutes.

Back to School Time: Pimento Cheese Sandwiches

It is completely crazy that summer is already over! Well, its not, we are still going to suffer through weeks more of insane heat, long days, and sad, dry lawns.  Yet, back to school the kiddos go next week.  I can't believe it.  Townes has been in school for a year now, so for him, I'm so excited to get him back and just let him have a great time and watch him grow.  For Hondo though, I am struggling a little bit with my sweet baby leaving me already.  

I'm being a little dramatic.  They don't even go to school for a full day.  Or a full week.  They go twice a week for four hours.  But still, he's my sweet little baby and I just can't believe its already been a year since he was born and he is going off to school.  He, on the other hand, is probably super excited (if he had any idea what was going on) because he loves other kids.

While I am stressing out a little that in just seven days my babies will be leaving me, the silver lining is that I got to go pick out a cute new backpack for Hondo to tote his lunch in, Townes gets a new lunch box (because one year was enough for the last one), and I will be more motivated to actually make dinner every night.  Why?  Because last night's dinner is almost always what my kids eat for lunch.

I have a pretty simple formula for packing lunch: 1) a protein, a.k.a. last nights chicken, 2) a fruit, 3) a little something crunchy, like pretzels or granola.  Sometimes I get crazy and toss in a cheese stick.  I almost always include a vegetable, but thats often encased in the category of last night's dinner too.

However, there are a couple of staples that I try to keep on hand in case we did something like actually finish the entire meal I cooked the night before, or went out to eat.  It's always great to have the fixings for a simple PB&J or grilled cheese, a carton of yogurt, and our family favorite: pimento cheese.

Aaron has always made the Pimento cheese around here and its so simple and easy.  The recipe makes a lot and it keeps very well.  I often make it on a Sunday during the school year, and just keep it in the fridge all week.  Townes will eat it on bread, out of bowl with pretzels for dipping (his favorite), or even fancied up in a grilled cheese.  I even have used it for entertaining and whipped some up with hard-boiled egg yolks and a little mayo and made Pimento Cheese Deviled Eggs, like I did for Alice's Baby Shower last July.  They were a HUGE hit.

It doesn't take many ingredients: cream cheese, cheddar cheese, pimentos, jalapenos, and a little cayenne.  Literally, just throw them into the bowl of stand mixer and whip it up.  Spread some onto some home-made sandwich bread, put mayo on the outside, grill, and enjoy!

Aaron's pimento Cheese

Yields about 3 cups

ingredients:

  • 16 oz (2, 8-oz blocks) of cream cheese, room temp
  • 16 oz block of cheddar cheese, freshly grated*
  • 4 oz diced pimentos, drained
  • 4 oz diced jalapenos, drained (or more, to taste)
  • Salt & Pepper
  • 1/2 tsp. Cayenne pepper (or more, to taste)

*I think its important for a recipe like this to use freshly grated cheese rather than a bag of pre-shredded if you can.  Pre-shredded cheese has a coating of powder that prevents the shreds from sticking together and clumping in the bag and it helps the shreds keep their shape.  This makes the cheese rather dry, in comparison to a freshly shredded block.  This moisture is important because it helps the cheese blend into the cream cheese well and makes for a smoother final product.*

In the bowl of a stand mixer combine the cream cheese and cheddar cheese.  Mix on medium speed until well blended.  Add the remaining ingredients, mix until combined.


Southwest Breakfast Casserole

Breakfast is without a doubt my favorite meal of the day.  It incorporates all of my favorite food groups: bread, cheese, eggs and bacon.  Is there even anything else you need? Yes, actually.  Breakfast sausage. Oh and hashbrowns!  See what I mean? Breakfast has all the good foods.

So it's no surprise that its my favorite meal to make in the house and I am always on the look out for breakfasts that fit a few criteria: it needs to feed a hungry boy appetites, adapt well to baby-size, come together quickly and easily, and be everything I want and expect from a delicious breakfast.  Easy right?

Well this breakfast is exactly that. It is full of potatoes, sausage, cheese, eggs and even a few veggies and has tons of flavor.  It also requires minimal prep and no crazy ingredients.  The final win for this casserole?  I didn't have to do a thing to it to serve it to my ten-month old, everything was already perfectly sized.

Southwest Breakfast Casserole

The steps are simple: chop your veggies, brown your meat, saute the veggies, mix, and bake. 

Southwest breakfast casserole

Serves 6

ingredients:

  • 1 lb. ground sausage (we used mild Italian, but go with whatever you like)
  • 1 large red bell pepper, cored and diced
  • 4 gloves of garlic, minced
  • 1 bunch green onions (about 8), white and green parts chopped, and separated
  • 1 tbs. butter or olive oil
  • 1 bag frozen diced potatoes
  • 6 eggs
  • 1/4 cup of heavy cream
  • Salt and pepper
  • 2 cups shredded cheese (we used a cheddar blend)

Preheat your oven to 375 degrees.  Remove the bag of frozen potatoes from the freezer and set it out to thaw as you prep the rest of the food.

In a saute pan over medium high heat, brown the sausage, breaking it up with a wooden spoon or spatula as it cooks.  Transfer to a paper towel-lined bowl to drain.  In the same pan, melt the butter and saute the bell pepper, white parts of the green onions, and garlic.  Transfer to the bowl with the sausage.

In a separate mixing bowl, whisk the eggs with the heavy cream and salt and pepper until frothy.  Set aside.

Remove the paper towels from the bowl with the sausage and veggies.  Pour in the frozen diced potatoes so it's half potatoes, half sausage and veggies (I used about 3/4 of the bag).  Stir the mix together so its evenly distributed.

Butter an 9x9 baking dish.  Pour the sausage mix into the dish and spread it evenly. Pour the egg mixture over the sausage mixture, covering the entire pan.

Bake for 15 minutes.  Remove, and using a spoon stir the mixture, turning it all over so the eggs don't just sink to the bottom and bake up like a quiche and more like a scramble.  Return to the oven for 15 minutes.  Top with desired amount of shredded cheese and return to the oven so the cheese melts.

Top with sliced green onions and fresh salt and pepper before serving.

Spicy Black Bean Burgers

This is my first entirely vegetarian recipe! Its not vegan, because there are eggs, but give me some time and I can figure out what someone could use as a vegan binder instead of eggs...though I would assume someone who is actually vegan would probably be a better person to figure that out. In any case, I think that's pretty exciting! While I love vegetables, the rest of this household its more inclined towards the carnivorous. However, this meal made each and everyone full and satisfied! Vegetarians for the win!

So you might ask, if no one likes things without meat, why did I even bother making these?  Valid question.  I'm not sure, I ask myself things like that all time. But in this case, I was inspired!

Years ago, my mom bought me a subscription to Cook's Illustrated, which I had always loved because of how much explaining it does.  It really gives you a wonderful understanding of why and how a specific method works or is better than another.  Knowing that stuff is what makes learning to cook without recipes so much more enjoyable and exciting.  Well, this month's Cook's Illustrated came in the mail, just as my mom was texting me and asking if I wanted to renew the subscription. I said, "ya know, probably not, I don't think I've really read it in a long time." 

Naturally, I flipped it open, and saw a whole two page article on vegetarian burger patties.  The black bean burgers just sounded to good! So I read the article, took in all its advice and tips and this was what I came up with; Aaron ate two, Townes ate his entire one, avocado and all, and our ten month old ate nearly two without the bun!  I think Townes was particularly proud and excited to eat them because earlier that day we had made the buns from scratch and he was able to do most of it himself.

I sliced open those fresh whole wheat buns, toasted them slightly on the flat top and added a little mayo.  When the patties were cooked, I topped them immediately with feta cheese and let it warm on the hot patties.  Then sliced avocado and red onion went on, and they were ready to eat.  I only snapped one picture because they did not last long.  All six were snatched up fast!

IMG_4917.jpg

Spicy black bean burgers

Makes about 6 medium patties

Ingredients:

  • 2 cans (15 oz each) of black beans
  • 1/2 cup coarse broken tortilla chips
  • 2 eggs
  • 2 tbs. flour
  • 1/2 tsp. salt
  • 1 tsp. ground black pepper
  • 2 tsp. garlic powder
  • 1 - 2 tsp. of adobe seasoning (chili powder or chipotle powder would be find substitutes, depending on your spice preference)
  • 1 tsp. ground cumin
  • Canola or vegetable oil, for frying
  • Feta cheese, for topping
  • Avocado, for topping
  • Red onion, for topping
  • Mayo, for topping
  • 6 burger buns

Line a large baking sheet with two or three layers of paper towels and set aside.  Drain and rinse your two cans of beans in a colander in the sink and then spread out your beans on the paper towel-lined cookie sheet to dry off.  You can also lay another layer of paper towels on top if you would like.  The less moisture on the beans the better your patty.

In the meantime, put your tortilla chips in the bowl of a food processor and pulse until they are a fine powder.  Transfer the ground chips to a large mixing bowl.  Stir in the 2 tbs, of flour and all the seasonings.  Whisk in the two eggs, until the mixture is a paste. 

Add the beans to the bowl, and using a potato masher, forks or even your hands, mash the beans into the paste evenly. Its important not to over mix the beans into a paste, but also not to leave the mixture too coarse.  You are looking for the mixture to be about 60-70% paste and 30-40% discernible beans. If it is too coarse, the patties won't hold together, and if its too mixed, the patties will be soggy.

When you are done, cover the bowl and refrigerate for at least two hours, but six or more would be ideal.  Once the mixture is chilled, using your hands, form six 1/2-inch-thick round patties. Set aside.

In frying pan, over medium heat, heat the oil to fry the patties.  Two at a time (or however will comfortably fit in your pan, don't over crowd them) fry each patty for 3-5 minutes on each side, until golden brown.  Serve immediately, on a toasted bun, topped with feta cheese, avocado, red onion and mayonnaise.

Broccoli Cheese and Rice Soup

My first job in Austin was at a little church pre-school in Brentwood.  I loved that place, I loved those kids, I loved my Tiny Turtles, it was really the best.  One of added bonuses to my job there was The Little Deli.  It's this little neighborhood pizzeria and deli.  Not a New York Deli by any stretch, but a wonderful sandwich menu, great pizza and five soups that they rotate daily.  

Their Broccoli Cheese and Rice soup immediately topped my list.  They serve it with crisp garlic bread slices, almost like crackers, that crumble perfectly on top.  A bowl of that and half a sandwich was the perfect lunch. 

Since I stay at home with my boys now and we don't live in that neighborhood, weekly lunches there are a thing of the past.  We have taken the boys a handful of times in the last two years, but I crave that soup way more often. So when Aaron had a bunch of dental work done last week and was on strict orders to eat soft, but filling foods, this came to mind.  I also was super tired from taking care of him and the boys so I needed something quick and easy.  Check.  I needed something both boys and I could and would eat too. Check.  Dinner was planned.

I've never made it before and The Little Deli shockingly, wasn't handing out the recipe.  So this was my version and I think it was pretty darn close!

Broccoli Cheese and Rice Soup

Makes 8-10 servings

Ingredients:

  • 2 cups, uncooked, white rice
  • 1 white onion, diced
  • 3 tbs. butter
  • 2 tbs. garlic powder
  • A dash of ground sage
  • Salt and Pepper
  • 3 tbs. flour
  • 3-4 cups chicken broth
  • 1 cup heavy cream
  • 8 oz block of sharp orange cheddar cheese, freshly shredded
  • 3 cups frozen broccoli florets (about 1 bag)

Cook your rice according to the directions in a saucepan or rice cooker.  Fluff and set aside.

In a large dutch oven or soup pot, melt 1 tb. of the butter.  Saute the onion until translucent. 

Add the garlic powder, sage, salt and pepper then melt the remaining butter and saute together for a moment.  Sprinkle the flour and stir until it is a golden paste.  You do not want it to burn so keep it moving, this should just take a minute.

A half cup at a time, whisk in 3 cups of chicken broth, whisking the mixture smooth at each addition.  Bring to a boil.  Stir in the 1 cup of heavy cream. Lower the heat to a simmer.

Add the shredded cheese and slowly stir until its melted and combined smooth. 

Note About Cheese: I recommend when making a soup like this that you purchase a block of cheese and shred it freshly for two reasons:  1) You can shred it on the finest side of a box grater and it will melt and blend more smoothly without clumping and 2) bags of shredded cheese are often coated in a powder that dries the cheese a little to prevent the shreds from clumping together in the bag, however, this moisture is important because it seems to prevent the oil in cheese from separating when it melts into the soup.

Stir in the rice and frozen broccoli and cook until the broccoli is warmed through.  While the broccoli cooks, taste your soup and re-season as needed. Serve immediately and enjoy.

Storage Note: This soup is enjoyed best fresh.  When it is refrigerated and stored the rice will absorb the broth over time and will become more of a casserole and less of a soup.  It is still very tasty, and actually serves better to kids this way - less loose broth = less spills.