Pumpkin Oatmeal Chocolate Chip Cookies

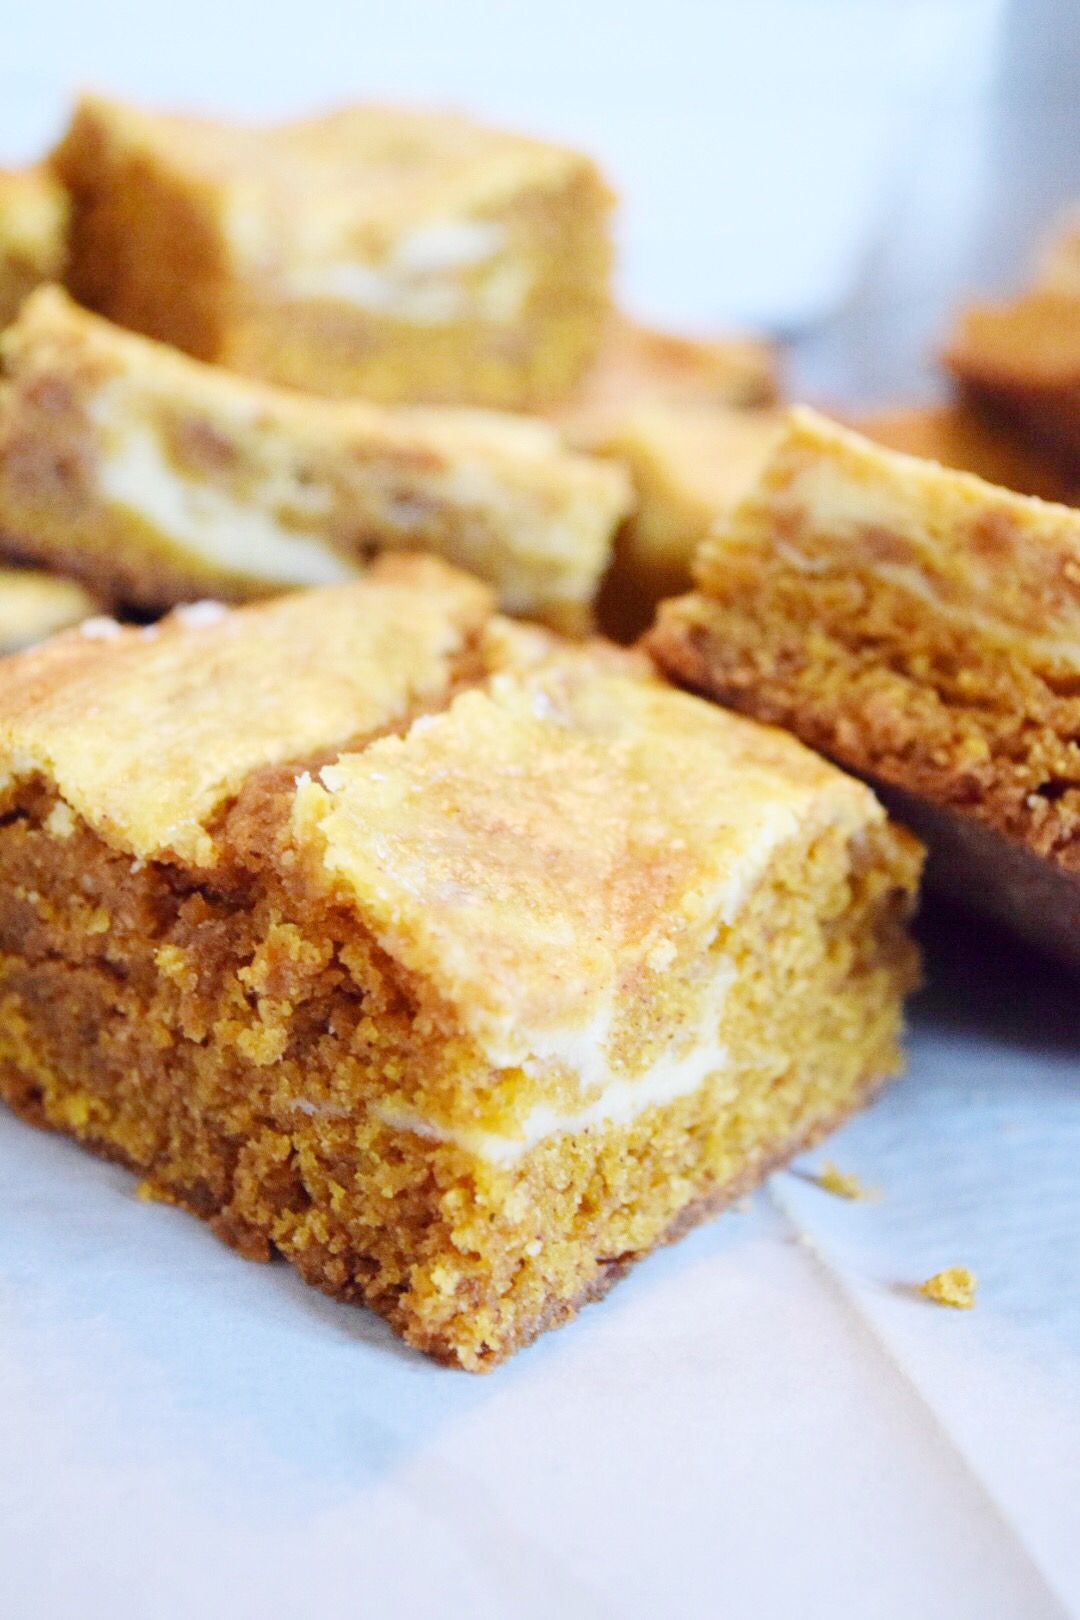
Yesterday when I was deciding what sweet treat to bake to send with Hondo to school, I hit a snag and couldn't decide what to make so I made two things.  I went the pumpkin route because its October and I'm very excited and because little ones really seem to like pumpkin (as do lots of big ones too).

I made these fantastic Pumpkin Cream Cheese Blondies and then I made these Oatmeal Chocolate Chip ones that I gussied up with pumpkin as well.  Its a variation of my favorite Oatmeal Raisin recipes from Sally's Baking Addiction - replace some egg with pumpkin, brown sugar and the right spices, replace raisins with chocolate chips and off we go!

Pumpkin Oatmeal Chocolate Chip Cookies

Yields 2.5 Dozen Cookies

Ingredients:

  • 1 cup (2 sticks) butter, softened
  • 1 cup light brown sugar
  • 1/4 cup granulated sugar
  • 7 generous tbs. of pumpkin puree
  • 2 tsp. vanilla extract
  • 1 generous tbs. molasses
  • 1 1/2 cups all-purpose flour
  • 1 tsp. baking soda
  • 1 tsp. salt
  • 1 tsp. pumpkin pie spice
  • 1/2 tsp. cinnamon
  • 3 cups old-fashioned oats
  • 1 generous cup milk chocolate chips

In a large bowl with an electric mixer, cream the butter and sugars until fluffy.  Beat in the pumpkin, vanilla, and molasses until smooth.

In a separate bowl, combine the flour, baking soda, salt, pumpkin pie spice and cinnamon.  A little at a time, beat the dry ingredients into the wet until combined.

Stir in the oats until evenly distributed.  Fold in the chocolate chips using a spatula, the dough will be thick and sticky.  Cover with plastic wrap and chill for 30 minutes to 1 hour.

Preheat your oven to 350 degrees.  Roll generous tablespoonfuls of dough into balls and place an inch and a half apart on a cookie sheet lined with parchment paper or silicone baking mat.

Bake for 10-20 minutes depending on desired chewiness.  You can take them out as soon as they begin to brown at the edges and just as the centers have set, or you can wait until the tops are golden.  Removing them earlier will yield a chewier cookie, but you will have to wait until completely cooled to remove from the cookie sheet.

Pumpkin Cream Cheese Blondies

October is here! Rejoice, it is officially autumn, the weather might actually start cooling off and the leaves might start falling! Break out your sweaters, pour a hot cup of anything and feel that breeze.

Oh and enjoy the pumpkins! Pumpkins everywhere.  They are pretty too look at a delicious to eat.  I love making things with pumpkin.  Its a nice earthy flavor, lots of nutrients to offer (not pumpkin spice, actual pumpkin), smells great and adds a nice layer of texture you can't quite replicate with another ingredient.

A while back I learned that because of the moisture in pumpkin puree, you can almost always replace eggs in a baking recipe with pumpkin (about 3 tbs per average sized egg).  So each fall I try it out on some new things.

This week was Hondo's birthday and gave me a great excuse to make some new pumpkin creations.  I wanted to send him to school with some special treats but having been a teacher for little ones his age, I didn't want to send anything covered in frosting and teeming with sugar.  Neither is a recipe for a happy class of toddlers and their teachers.

Thankfully, most kids love pumpkin too so I thought this was a great opportunity.  For the longest time, Townes though pumpkin muffins were cake - no frosting needed.  The same has been true with Hondo.

I couldn't decide what to make to I tried out two new things: Pumpkin Oatmeal Chocolate Chip Cookies and Pumpkin Blondies with a Cream Cheese Swirl.

The recipe I used for these Blondies is my great-grandmother Pauline Crocker's.  She made her blondies with chocolate chips in them and always had a batch in the pantry waiting for her grandkids (my mom).  I replaced some of the eggs with pumpkin, but not all of them because I didn't want them to be fluffy and cakey, but dense like a fudge brownie, they ended up somewhere in between.  I also added some cinnamon, pumpkin pie spice, and obviously, the cream cheese swirl.

They didn't take long at all to whip up and came out lovely.  I still want to concoct a denser, fudgier type pumpkin bar, but haven't nailed it yet - stay tuned though, I'm sure I'll crack it this fall!

Pumpkin Cream Cheese Blondies

Fills a 9 x 12 baking pan

For the Pumpkin Bar:

  • 2/3 cup butter, melted
  • 2 1/4 cup (1 lb. pkg) of dark brown sugar
  • 3 eggs
  • 7.5 oz (half of a 15 oz. can) of pumpkin puree
  • 2 2/3 cups all-purpose flour
  • 2 tsp. baking powder
  • 1 tsp. salt
  • 1 tsp. cinnamon
  • 2 tsp. pumpkin pie spice

For the Cream Cheese Swirl:

  • 8 oz. bar of cream cheese, softened to room temp.
  • 1/4 cup granulated sugar
  • 1 tsp. vanilla
  • 1/3 cup heavy whipping cream
  • 1 egg

Preheat your oven to 350 degrees; grease a 9 x 12 baking pan and line the bottom with parchment paper. Set aside.

In a large mixing bowl, stir together the melted butter and brown sugar until combined.

Using a hand mixer or stand mixer, beat in one egg at a time, until just combined - do not over mix.  Next, stir in the pumpkin puree until combined.

In a separate bowl, combine the remaining dry ingredients.  Stir together and then mix the dry ingredients into the wet a little at a time until smooth.  Set aside.

Make the cream cheese swirl.  Using a hand mixer, whip the cream cheese until smooth.  Add the sugar, egg, vanilla and cream and whip until stiff peaks form.  Set aside.

Pour two-thirds of the pumpkin batter into the prepared pan.  Spread it evenly across the bottom of the pan.

Using a large spoon, drop large dollops of the cream cheese mixture on top of the pumpkin batter in the pan.  Drop the remaining pumpkin batter among the cream cheese.

Then, using a butter knife, swirl the cream cheese and pumpkin batter together slowly.  Don't worry if it doesn't look too pretty, when you cut them it always seems to work out.

Bake for 35-40 minutes, until a toothpick comes out clean.

Allow to cool in the pan completely before cutting and serving.  Enjoy!


Matzo Ball Soup

The majority of my best friends growing up were Jewish (and are still some of my best friends) and I was so lucky to be exposed to so many wonderful traditions, foods, and families.  One of my best memories is having holiday dinners at my friends and having brisket and my favorite, matzo ball soup at Passover!

Matzo ball soup is something I miss terribly living in Texas.  You can't find it anywhere.  I mean ANYWHERE in Austin.  Its not like bagels, where they are just not very good, but you can get them.  I seriously can not find a place to get Matzo Ball Soup here, but I have been pretty intimidated to make my own.  I never made it at home, my friend's moms always made it and they set the bar really high.

But Chanel was sick this week, allergies just giving her sinus problems and a sore throat, but she wanted soup and she had never had Matzo Ball Soup and it had been on my list of things to tackle for a while - so we did it!

I reached out to my friends and their moms before diving in to make sure I did the right things and used the right seasoning and correct process.  Boy, am I glad I did!  These were the best!  So light, so fluffy, the right size, and so flavorful!

I have to admit, I didn't make chicken soup.  I made a broth with vegetables and seasoning and chicken broth, but no chicken.  As I say about chicken and dumplings, "I eat the dumplings because I want to, I eat the chicken because I have to."  That rule applies even more to Matzo Ball Soup.  I only want the Matzo balls, who needs chicken?  None of my Jewish mamas put chicken in the finished product.  They made a broth from scratch with chicken feet and vegetables, but served a matzo ball with the just broth (no veggies or chicken) poured over it and garnished with dill.  We went that route more or less, but kept the veggies because they are so tasty too!

However, the Matzo balls are not cooked in the soup, they are boiled separately and then you pour the soup over them.  So you can use whatever chicken soup recipe makes you the happiest!  I will include how we made our broth, which I think was perfection, but there are lots of wonderful chicken soup variations, so go with what you love.

Matzo ball soup

Makes 6-8 Matzo Balls

For the Matzo balls:

  • 5 oz (2, 2.5 oz packets) of Matzo Ball Mix (we used Manischewitz)
  • 4 eggs
  • 4 tbs. olive oil
  • 1 tbs. dill
  • 1 tbs. parsley
  • 1 tsp. salt
  • Fresh cracked black pepper

for the broth:

  • 4 cups chicken broth (we used Swanson's)
  • 1 tbs. olive oil
  • 4 carrots, sliced or diced
  • 1 small/medium yellow onion, diced
  • 3 celery stalks, diced
  • 1/2 purple top turnip (optional), diced into bite sized cubes
  • 1 tsp. dill
  • 1 tsp. basil
  • Salt and Pepper

Prepare the Matzo Balls: In a large mixing bowl, whisk the eggs and the oil together.  Mix in the seasonings. Using a fork or a spatula, mix in the Matzo Ball mix, until just combined, but do not over-mix.

Cover the bowl with plastic wrap and refrigerate for at least 20 minutes, or until ready to boil. They taste best fresh, so don't boil them until before you are ready to serve the soup.

Make the broth: Over medium high heat, saute your vegetables in the olive oil in a large dutch oven or stock pot.  Sprinkle with the seasoning, add the broth and bring to a boil.  Boil until the vegetables are tender and cooked through.

Boil the Matzo Balls: Fill a medium or large pot with water and bring to a boil.  When the water is boiling, remove the dough from the fridge and form the balls.  Using a large spoon, scoop out a heaping tablespoon of dough and roll into a smooth ball with your hands. 

I recommend a ball about the size of a golf ball (they will expand as they cook, nearly double in size).  This will yield balls about the size of a tennis ball; we served two in a bowl and it was plenty.  You can go larger or smaller depending on your preference.

Drop the formed balls into the boiling water.  We did four at a time, you don't want them to be too crowded since they will expand quite a bit.  We did two batches.

Cover the pot and reduce the heat to a low boil (not a simmer, but you don't want the water boiling over).  Boil for 30 minutes and do not remove the cover until they are done.  Thankfully we have clear pot tops and I could peek with excitement without taking the lid off.

Remove the balls with a slotted spoon directly into soup bowls.  Pour broth over the balls and serve immediately.


Baked Potato Shepherd's Pie

I love comfort food.  So much that I wish it was a cold season almost all the time because my favorite feeling is being cold, putting on a warm sweater, leggings, and big socks and settling down with a warm mug of soup or digging into a hot meal - I know, I'm so basic, don't hate.

In any case, it rained in Austin today and I felt a cool breeze so I immediately put a sweatshirt on (and started sweating a little) and walked to the grocery store to pick up food to make a comfort food feast for dinner.

Chanel had suggested Shepherd's Pie or Loaded Baked Potatoes - I'm terrible at choosing, so I made both.  The concept is really simple, it's a little time consuming for a weekday dinner I suppose; it probably took an hour start to finish before we were sitting down eating.

I kept it simple and "baked" my potatoes in the microwave - you probably need to do it 5-7 minutes per potato.  So if you are doing three potatoes at a time (more than that won't fit in my microwave) you poke each potato all around with a fork, put them in the microwave, cover them with a damp paper towel, and microwave on high for 15-20 minutes.

While I cooked the two batches of potatoes I was able to cook the bacon and make the sausage and veggie filling.  This was a much better use of time than wrapping them in foil and waiting an hour while they did their thing in the oven. The "Shepherd's Pie" filling was a simple variation on the standard ground beef, peas and carrots.  My kid's seem kind of burnt out on peas this week, so I decided to mix it up and chop some broccoli really small, saute it with onion and garlic, then add ground sausage instead of beef (I love all the extra flavor), season it with a bit of sage and basil, thicken it with a little gravy and it was ready to go.  I think the standard beef, peas and carrots would be divine though and you could make the gravy the same way.  Use your imagination!

I made the mashed potatoes with cream, butter, salt, pepper, broth, and some shredded cheese. Once that was mixed up, its all assembly!  Line your scooped out potatoes with a little bit of mashed potatoes, then fill with meat and veggies, sprinkle a little cheese, top with heaps of mashed potatoes, cheese, bacon, and green onions.  Bake till the cheese is melty and enjoy!

Baked potato shepherd's pie

Serves 6

ingredients:

  • 6 medium-large russet potatoes
  • 2 sticks of butter, divided
  • 4-6 garlic cloves, minced
  • 1/2 small white onion, diced
  • 1 cup fresh broccoli, chopped small
  • 1 lb. ground sausage
  • Salt and Pepper
  • 1 tsp. ground sage
  • 1 tsp. dried basil
  • 2 tbs. flour
  • 1 -2 cups beef broth, divided
  • 1/2 cup or more heavy cream
  • 2 cups shredded cheddar
  • 1 lb. bacon, cooked, drained and diced
  • 1 bunch (6-8) green onions, green parts sliced

Preheat your oven to 350 degrees.

Begin cooking your potatoes in the microwave. Rinse your potatoes and poke them all over with a fork.  Fit as many in your microwave as you can comfortably (don't stack them - I only fit three) and cover with a damp cloth or paper towel.  Microwave on high for 5-7 minutes per potato - my two batches of three potatoes each took 20 minutes. As the first batch is done, remove them and set them on a cookie sheet to cool.

While your potatoes are baking and cooling, make the filling.  In a large pan or dutch oven over medium-high heat, melt three tbs. of butter.  Add the garlic and onion and saute until translucent and fragrant.  Add another 2 tbs. of butter and then add the broccoli.  Season with salt, pepper and the sage and basil.  Saute gently for a few minutes until warmed.

Push the veggies to the side and add the ground beef to the pot.  Using a wooden spoon or rubber spatula, break up the sausage as it cooks, working it into the veggie mix.  Once the meat is all broken and cooked, stir to combine evenly with the veggies. 

Sprinkle the flour over the sausage mixture and stir until coated and combined.  Slowly add 1/2 cup of beef broth, stirring to create a thick gravy holding the sausage mix together.  If you want it with more gravy, stir in more broth until its the consistency you like.  Remove from heat and set aside.

Prepare the potatoes.  With the potatoes cool enough to touch, slice the very top layer off the potatoes and scoop out the middle, leaving 1/4 inch of potato lining to skin to hold it together.  Fill a large mixing bowl with the scooped out potatoes and set the six remaining skins on a cookie sheet.

Add 6 tbs. of butter to the potatoes in the bowl with some salt and pepper.  Using a hand mixer, beat the potatoes on low.  Slowly add the heavy cream a little at a time.  I like the potatoes to be more the consistency of a fluffy paste, not runny, so add just a little at a time to make sure there isn't too much liquid.  Once that is well combined, add 1/4 cup (or more) beef broth and mix.  Finally, whip in a good handful of shredded cheese.  Set aside.

Finally assemble the potatoes.  Using a spoon, line the inside of the potato skins with a thin layer of mashed potatoes. Next, fill the rest of the potato up with the sausage and broccoli mixture (evenly distribute the mix among all six potatoes).  Top with a sprinkle of cheese.  Top the potato with heaping spoonfuls of mashed potatoes, then shredded cheese, bacon, and green onion.

Arrange the assembled potatoes on a baking sheet and bake for 10-15 minutes, until the cheese is melted and gooey.  Serve immediately.

White Russian Casserole

I don't know if this is a casserole as much as it is a family-sized sandwich.  You put it together like a sandwich but in a casserole dish and then you bake it to crispy, melty deliciousness. 

The Inspiration for this came from a sandwich I ate all the time in high school back home in New York.  There was a restaurant down the road from my mom's house, The Katonah Bar and Grill (which has since been renamed Oliver's and the menu is different), and they had a sandwich on the menu, the White Russian.  I'm not entirely sure why it was called that, but it was my favorite.

It was layers of turkey, ham, bacon, cheese and Russian dressing in between buttery-toasted rye bread.  They served it with beer battered french fries and a pickle.  I highly recommend the pairing - however, I didn't have any fries to go with this dinner.

This is honestly one of the easiest, cleanest meals I've ever put together.  With the exception of a bowl for melted butter and a cutting board, all you need is a knife and a casserole dish.  Woohoo! A meal that requires practically no clean-up!

This would also be a great dish for a winter potluck of sorts - a football party or something.  Its basically the epitome of a bar food casserole. 

Anyway, back to making it.  You butter the bottom of your dish, then layer like a sandwich: rye bread (topped with a little butter), provolone cheese, ham, turkey, bacon, Swiss cheese, Russian dressing, rye bread (a just a bit more butter).  Cover it with some foil so it doesn't burn while the cheese melts, bake it for 20 minutes at 400 degrees.  Uncover it and bake for 5 more minutes to toast up the bread on top. It's that easy! Enjoy!

White Russian Casserole

Serves 6-8

Ingredients:

  • 6 tbs. butter, melted
  • 10 slices of Rye bread, cut in 1-inch squares
  • 4-6 slices of Provolone Cheese, cut in 1-inch squares
  • 8 oz. deli sliced ham, cut in 1-inch squares
  • 8 oz. deli sliced turkey, cut in 1-inch squares
  • 1 lb. bacon, cooked, and diced
  • 4-6 slices of Swiss Cheese, cut in 1-inch squares
  • Russian dressing

Preheat your oven to 400 degrees.

Brush the bottom of a 12x9 casserole dish with the melted butter.  Layer half the bread on the bottom of the dish, brush with butter.

Layer the Provolone cheese on top of the bread, followed by the ham, then turkey, bacon, and Swiss cheese. 

Drizzle Russian dressing over the entire casserole (amount to your preference).

Top with the remaining rye bread, brush with butter.  Cover the casserole with aluminum foil.

Bake, covered, for 20 minutes.  Remove the foil and bake for an additional 5-8 minutes, until top layer of bread is toasted golden.